


Hey Everyone, I’m happy to introduce you this blog about some interesting tools used in CTF-based challenges and also real cases DFIR analysis, So lets get this.
Introduction to DFIR
First, lets take an overview about DFIR, which is an abreviation of Digital Forensics and Incident Response, it plays a crucial role in identifying, analyzing, and mitigating cyber threats ( This is the best definition btw HHHH ). Capture The Flag (CTF) competitions often include challenges that simulate real-world forensic scenarios, requiring participants to use a variety of tools to solve complex puzzles.
So in today’s post, we will explore some of the most effective tools used in DFIR for CTF challenges.
What are you waiting, lets get this shiiit done.
Note : The installation of each tool will be provided at the end of the blog.
Basic Tools Every CTF Player Should Know
So the tools that we’ll be seeing now are some shiiity and important ones that a CTF player should use first ( if needed ) at the beginnig of a challenge.
Different files tools
File tool
Beginnig with my precious one, file tool. This one used to verify the type of a file. It can be useful for identifying the type of certain suspicious files, like iles without an extension.
Here is an example : 
- How to use it :
file file_name
pngcheck
This one is pretty similar to the previous but it support only png images, it simply check if a given image is png or not.
- How to use it :
pngcheck image_name.png
exiftool
exiftool is a platform-independent Perl library plus a command-line application for reading, writing, and editing metadata in a wide variety of files.
- Features : It can extract metadata from images, modify metadata, and support for various image formats.
- How to use it :
exiftool file_name - For more Info :
exiftool --help
Lets take a simple example, suppose we want to extract an image metadata like time capture, location, dimension …
The output should contain these informations as shown below: 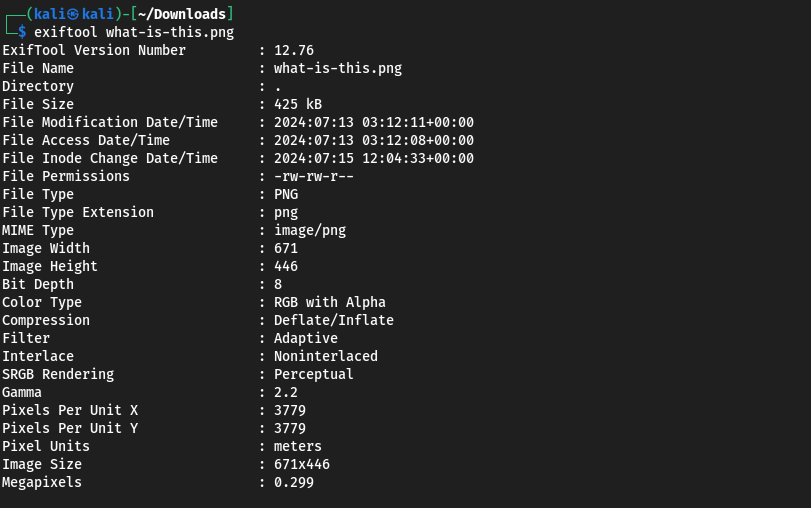 Some times you should be carefull about a section named
 Comments ( Not presented here ) where can be the flag or a hint to the flag.
stegsolve
stegsolve is a tool that allows you to analyze images for steganography, often used to hide messages within images.
- Features : Provides multiple analysis tools, such as color filters, LSB steganalysis, and more.
- How to use it : First ensure that you have java sdk installed (.jar) then locate the file
/stegsolve/bin/stegsolve.jarand execute it.
As a live demo, here is how : 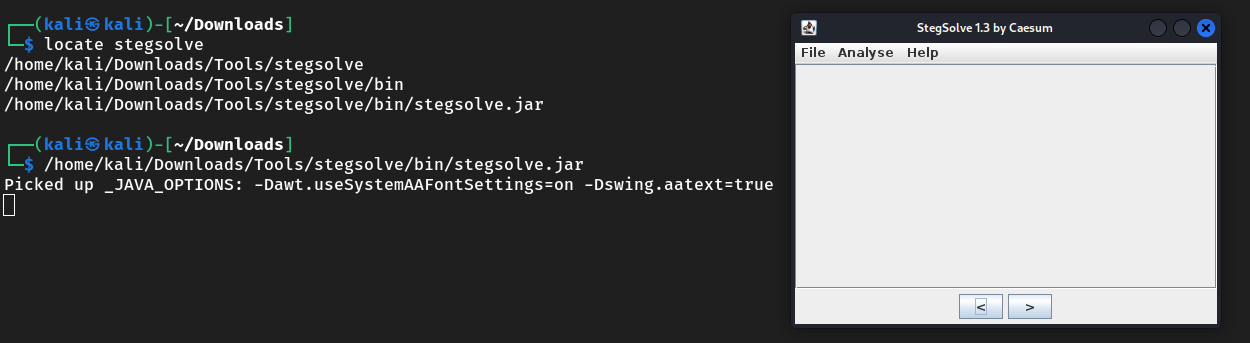
zsteg
zsteg is a tool used to detect hidden data in PNG (LSB steg) and BMP files.
- Features : Detects various steganographic methods, extracts data, and supports multiple file formats.
- How to use it :
zsteg [options] filename.png [param_string]
binwalk
binwalk is a tool for analyzing, reverse engineering, and extracting firmware images. It helps in identifying embedded files and executable code within firmware images.
- Features : Signature scanning, entropy analysis, and file extraction.
- How to use it :
binwalk --extract file_nameto extract hidden files orbinwalk --helpto discover all its benefits.
hexedit
hexedit is a hexadecimal editor that allows users to view and edit binary files.
- Features : Navigate and edit files at the binary level, useful for forensic analysis and debugging.
- How to use it :
hexedit file_name
Lets take it on an example : 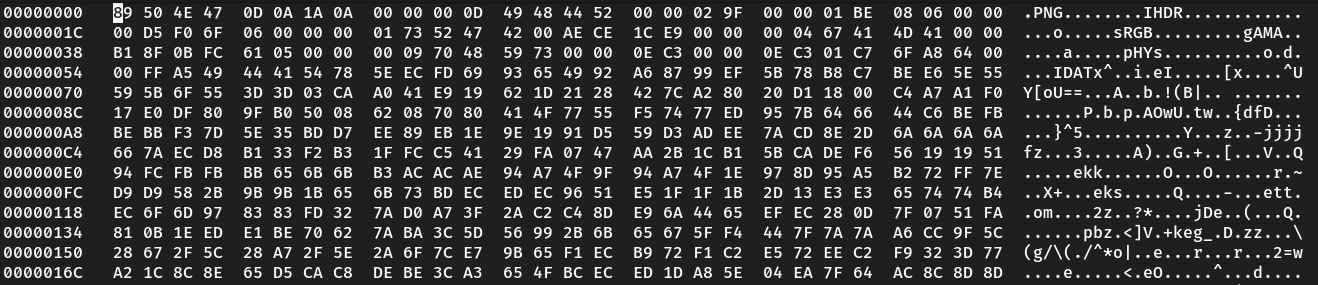 Note that the file is a png so we should see the chunks PNG or the hex values corresponding to it.
xxd
xxd is a utility that creates a hex dump of a given file or standard input.
- Features : Convert binary files to hexadecimal format and reverse.
- How to use it :
xxd file_nameto create a hex dump orxxd -r hex_dump_fileto reverse the process.
Lets take it on an example : 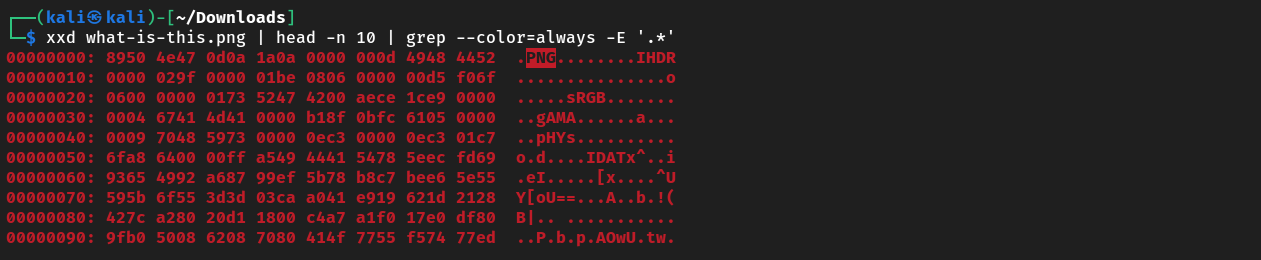 Same output as
 hexedit but as a reminder xxd is not a hex editor.
Steghide
Steghide is a steganography tool that can hide data in various types of image and audio files.
- Features : Embedding and extracting data from cover files using robust encryption.
- How to use it :
steghide embed -cf cover_file -ef embed_fileto embed data andsteghide --extract -sf stego_fileto extract hidden data.
Foremost
Foremost is a file recovery tool that scans a disk image, searching for specific file types based on their magic bytes and headers.
- How to use it :
formost file_name
So until now, i think that’s enough as a beginning, note that you should search and do some OSINT for other tools depending on the situation of the challenge.
Lets move now to other tools but this time we’ll discover the online ones.
Online Tools
Note that you should discover these tools by your self, dont be lazy Freak, I’ll just describe them. ( I’m being Lazy right now, Shit ) Whatever.
Forensically
First but not least, Forensically. Which is an online forensic analysis tool that allows you and me to extract hidden data from images using various techniques.
Services and Features
Error Level Analysis (ELA): It can identifies areas of an image that have different levels of compression, often indicating manipulation.
Clone Detection: it detects duplicated areas within an image.
Noise Analysis: It highlights areas with different noise patterns, which can indicate tampering.
Meta Data Viewer: It displays metadata ( seen at exiftool ) embedded in image files.
Magnifier and Zoom: It allows for detailed examination of image areas.
Pixel and Color Analysis: Also it can analyzes the colors and pixels in an image to detect anomalies.
Go discover it, it’s a usefull tool full of automated functionalities. Forensically .
StegOnline
StegOnline is a comprehensive steganography tool that enables users to upload images, modify them, and extract hidden data. I did solve many challenges with this one, it has several benefits like color inversing, bitplanes browsing and much more.
Check it here StegOnline
Steg 1 and Steg 2
These two are also intresting, Steg 1 and Steg 2 are online tools that provide encoding and decoding of files within images, offering powerful steganography capabilities.
Aperi'Solve
You should absolutely put this tool in you mind, because it gather about 9 or 10 from previous tools at the same time ( strings, file, zsteg, binwalk, foremost, … ) .
It called Aperi’Solve, it is an advanced online forensic tool that offers static analysis and integrates tools such as the above ones for comprehensive file inspection and data extraction. Go check it Aperi’Solve .
Stegseek
Stegseek is a lightning-fast steghide cracker designed to extract hidden data quickly from files.
These tools cover a wide range of capabilities from steganography detection and data extraction to forensic file recovery and online analysis, essential for tackling DFIR challenges in CTF competitions.
Audio Files (WAV, MP3, etc.)
Audacity
Audacity is a free, open-source, cross-platform audio software for multi-track recording and editing.
- Features : Audio editing, noise reduction, format conversion, and spectrogram analysis.
Sonic Visualiser
For me, I use this instead of Audacity, ( it’s not personal Audacity, Sorry ).
Sonic Visualiser is an application for viewing and analyzing the contents of music audio files.
- Features : It can acheive detailed visual analysis, Spectograms viewing, annotation layers, time-domain views and much more.
- How to use it : Locate SonicVisualizer and execute it, it should be something like this
/SonicVisualizer/SonicVisualiser-4.5.2-x86_64.AppImage
Advanced DFIR Techniques and Tools
Now we are on the way to discover more powerfull tools that will help us on our analysis tasks and difficulties.
To structre the contents very well, i’ll devide DFIR Techniques to 3 parts. From Timeline Analysis to Registry Analysis.
Don’t worry, we’ll see other more advanced techniques in comming blogs.
Timeline Analysis
So Timeline analysis involves creating a chronological sequence of events from forensic data. Here are some of the top tools for this process:
Autopsy
This Tool saves you a lot of time in order to analyse a raw or a disk partition, It provides you with a Graphical interface for The Sleuth Kit (TSK). We’ll encounter it in several challenges later.
X-Ways Forensics
This one provides features like Disk imaging, file recovery, and timeline analysis.
Forensic ToolKit (FTK)
This one is important asf, FTK. It is a comprehensive forensic analysis tool developed by AccessData. It offers us extensive capabilities for digital forensics and incident response, particularly in the area of timeline analysis.
- Features:
- Comprehensive Forensic Analysis: FTK provides tools for analyzing disk images, file systems, and memory dumps, enabling comprehensive forensic investigations.
- Timeline Creation: It includes robust features for timeline analysis, allowing investigators to reconstruct sequences of events based on forensic data.
- Keyword Searching: From it’s benefits, a powerful search capabilities for identifying relevant evidence within large datasets.
- Integration: It supports integration with other forensic tools and databases, enhancing workflow efficiency.
- Reporting: It also generates detailed reports and timelines that are crucial for presenting findings in legal proceedings.
FTK is widely used by forensic professionals and law enforcement agencies due to its reliability and extensive feature set, making it a cornerstone tool in digital investigations.
Forensic Explorer
Forensic Explorer is a robust forensic tool designed for in-depth disk analysis and investigations, featuring comprehensive capabilities including timeline analysis.
- Features:
- Disk Analysis: Powerful tools for examining disk images and file systems, recovering deleted data, and analyzing file metadata.
- Forensic Capabilities: Supports forensic analysis of various file formats and data types, aiding in digital investigations.
- Timeline Capabilities: Includes features for creating timelines of events based on forensic data, crucial for reconstructing sequences of activities.
- User-Friendly Interface: Intuitive interface designed for ease of use in forensic examinations.
- Reporting: Generates detailed reports to document findings and support legal proceedings. This one is also widely utilized by forensic professionals and organizations requiring advanced tools for detailed disk and timeline analysis in digital investigations.
Passing now to my favorite tools related to malwares, these type of challenges are my favorites.
Malware Analysis
Analyzing malware involves understanding its behavior, impact, and origin. Here are some of the tools that i use for malware analysis and CTF challenges :
Volatility
First, I should thank the creators of this tool because it has several functionalities that aims to help us on malware and memory analysis.
Volatility and who doesnt know it, is a prominent open-source framework designed for memory forensics, particularly useful in malware analysis. It allows us to extract and analyze volatile memory (RAM) from memory dumps of Windows, Linux, macOS.
Volatility’s capabilities include examining running processes, network connections, open files, dump files, and registry hives stored in memory. This tool is crucial for identifying malicious processes, analyzing rootkits, and uncovering malware artifacts present in volatile memory. Its flexibility and extensive plugin support make it a versatile choice for memory forensics in cybersecurity investigations.
So if you aren’t patient about discovering it in other blog, here is a small tutorial to start with Volatility 2.6.
The last version of volatility is volatility 3, you can find differences between the two versions on this awsome blog Volatility 3
REMnux
When we will encounter some malwares analysis challenges, we dont want to analyse it in our local machine, I’m sure you know why, because if something’s wrong happen during the analysis like executing malicious files accidently can damage your locale machine or compromise your data.
So in order to avoid such things like that, we should use a virtual machine. Here it comes REMnux, which is a specialized Linux distribution tailored for malware analysis, reverse-engineering, and threat intelligence. Developed by Lenny Zeltser, REMnux includes a curated collection of tools and scripts focused on analyzing malicious software and exploring suspicious files in a controlled environment.
It simplifies the setup of malware analysis workflows by providing pre-configured tools like debuggers, disassemblers, network traffic analyzers, and sandbox environments. It is particularly valuable for examining file artifacts, deobfuscating scripts, and extracting embedded executables from malicious documents.
So as i said, dont risk your data and you hardware, try to install it and use it during your analysis.
Ghidra
Lets take a scenario,suppose that we have a malware and we want to reverse it or do some reverse engineering on it in order to reveal it’s powerful capabilities, So here where reverse engineering programs, debuggers and desassemblers comes to work.
One of known one is Ghidra, which is a powerful software reverse-engineering suite developed by the National Security Agency (NSA). It offers a comprehensive set of tools for analyzing binary executables and malware samples. Ghidra includes a disassembler, decompiler, and powerful scripting capabilities, allowing analysts to explore and understand the behavior of compiled code.
Its interactive GUI and robust scripting framework facilitate the analysis of complex malware binaries, enabling detailed examination of functions, data structures, and control flows. Ghidra supports multiple architectures and file formats, making it suitable for analyzing a wide range of malicious software across different platforms.
Security analysts, As well as we, rely on Ghidra for deep-dive analysis, vulnerability research, and understanding sophisticated malware operations.
Registry Analysis
The Windows Registry contains information about the system’s configuration and users. Here are top tools for analyzing the Windows Registry :
RegRipper
- Features : Tool for extracting and analyzing data from Windows registry hives.
Windows Registry Viewer (WRV)
- Features : Tool for viewing and editing the Windows registry.
Registry Explorer
Features : Graphical tool for viewing and editing the Windows registry.
These tools provides us with such a comprehensive capabilities for timeline analysis, malware analysis, and registry analysis in DFIR, essential for tackling complex challenges in CTF competitions and real-world scenarios.
Installation Instructions for DFIR Tools
| Tool Name | Installation Steps |
|---|---|
| Autopsy | 1. Download Autopsy installer from official website. 2. Follow installation instructions for your operating system (Windows, Linux, macOS). |
| X-Ways Forensics | 1. Download X-Ways Forensics installer from official website. 2. Run installer and follow on-screen prompts. |
| Forensic ToolKit (FTK) | 1. Download FTK installer from official website. 2. Install and configure as per instructions. |
| Volatility | 1. Install dependencies (Python, pip). 2. Install via pip: pip install volatility.3. Verify installation: vol.py --info. |
| REMnux | 1. Download REMnux ISO from official website. 2. Create bootable USB or VM. 3. Boot and follow setup instructions. |
| Ghidra | 1. Download Ghidra installer from official website. 2. Install and follow setup wizard instructions. |
| RegRipper | 1. Download RegRipper from GitHub repository. 2. Extract files to a directory. 3. Use scripts as per documentation. |
| Wireshark | 1. Install Wireshark package via package manager (apt, yum, brew). 2. Follow system-specific installation instructions from official website. |
| FTK Imager | 1. Download FTK Imager installer from official website. 2. Install and follow setup wizard instructions. |
| File tool | 1. Install via package manager: apt install file (Debian/Ubuntu) or yum install file (RedHat/CentOS). |
| pngcheck | 1. Install via package manager: apt install pngcheck (Debian/Ubuntu) or yum install pngcheck (RedHat/CentOS). |
| exiftool | 1. Install via package manager: apt install exiftool (Debian/Ubuntu) or yum install exiftool (RedHat/CentOS). |
| stegsolve | 1. Download Stegsolve from official repository. 2. Ensure Java SDK is installed. 3. Run: java -jar stegsolve.jar. |
| zsteg | 1. Install via Ruby gem: gem install zsteg. |
| binwalk | 1. Install via package manager: apt install binwalk (Debian/Ubuntu) or yum install binwalk (RedHat/CentOS). |
| hexedit | 1. Install via package manager: apt install hexedit (Debian/Ubuntu) or yum install hexedit (RedHat/CentOS). |
| xxd | 1. Install via package manager: apt install xxd (Debian/Ubuntu) or yum install xxd (RedHat/CentOS). |
| steghide | 1. Install via package manager: apt install steghide (Debian/Ubuntu) or yum install steghide (RedHat/CentOS). |
| foremost | 1. Install via package manager: apt install foremost (Debian/Ubuntu) or yum install foremost (RedHat/CentOS). |
| Forensically | No installation required, available online at Forensically. |
| StegOnline | No installation required, available online at StegOnline. |
| Steg 1 and Steg 2 | No installation required, available online at Steg1 and Steg2. |
| Images Color Picker | No installation required, available online at Image Color Picker. |
| Aperi’Solve | No installation required, available online at Aperi’Solve. |
| Stegseek | 1. Download Stegseek from official repository. 2. Compile and install following the instructions provided. |
| Audacity | 1. Download Audacity from official website. 2. Follow installation instructions for your operating system. |
| Sonic Visualiser | 1. Download Sonic Visualiser from official website. 2. Follow installation instructions for your operating system. |
Conclusion
Mastering DFIR tools is crucial for tackling forensic challenges in CTF competitions. These tools not only helps us in solving CTF challenges but also enhance your skills for real-world cybersecurity incidents. Stay tuned for more in-depth guides on using these tools effectively in various scenarios.
Join us in the next post where we will dive deeper into practical applications and advanced techniques in DFIR. .